The first time I ever tried macro photography, I used a cheap third party telephoto lens with macro mode and it was love at first sight. I was hooked. Nothing in my house or garden was safe from being photographed close up. If you think you need the most expensive professional kit to get started in macro, I’m here to tell you that you’re wrong. In this post I’m going to talk about macro photography ideas for beginners and share some budget-friendly, easy macro photography ideas you can try right at home or in your garden.

Why Macro Photography?
Macro photography gets you close to details that often go unnoticed. Even the most boring of objects become fascinating when you view them from just a few centimetres away.
You’ll notice textures, patterns, and shapes that simply don’t register at normal viewing distances. It’s like stepping into another dimension – one that’s full of little surprises.
Personally, I had no idea what the face of a Bee looked like until I did macro photography. I didn’t even realise it had a massive tongue, which was weird and awesome to find out.

For beginners, macro photography is also a brilliant way to hone essential photography skills.
You’ll develop a better understanding of focus, depth of field, and lighting, all of which can improve your overall technique, even when you’re not shooting macro.
And the best part? You don’t need the latest camera or lens to get started. Let’s look at some simple setups and easy macro photography ideas that anyone can try.

This post may contain affiliate links, where I make a commission on purchases made through affiliate sites at no extra cost to you.
Equipment Ideas For Beginner Macro Photography
When people hear “macro photography,” they often assume they need a top of the range camera and an expensive macro lens.
While dedicated macro lenses (those capable of 1:1 magnification) can produce outstanding results, they aren’t your only option. Below are a few budget-friendly ways to get started.
Clip-on lenses for phones:
If you only have a smartphone, consider a clip-on macro lens. These are widely available and typically cost under £20. Always check the compatibility of your phone when getting any clip-on lenses.
Close up filters:
These screw onto the front of your existing camera lens and act like magnifying glasses. They can’t match the clarity of a true macro lens, but for learning and experimenting, they’re great fun and very affordable. Just make sure you get the right size for your lens.
Extension tubes:
Placed between your camera body and lens, extension tubes reduce the minimum focusing distance, letting you get closer to your subject. Third-party brands often sell sets at a fraction of the cost of an actual macro lens.
Reverse lens technique:
If you’re feeling adventurous (and perhaps a bit more experienced), you can detach your lens, flip it around, and hold it to the camera body. It’s a bit fiddly, but it can get some cool results.
Telephoto lens with macro setting:
This is the exact lens that I started with. It was far cheaper than a dedicated macro lens and I could use it as both a telephoto lens and a macro lens. It’s pretty decent quality for its price and I absolutely loved using it.
Third party lens:
If you want to get an actual dedicated macro lens, consider a third party lens such as a Sigma 105mm f/2.8 which is much more budget friendly than a lot of other lenses. It’s also the lens responsible for a lot of the images in this post.
Second hand lens:
Another option is to go second hand and get a deal on a lens you really want. I recommend going through a trusted second hand supplier such as MPB.com.
Regardless of your setup, you can capture some genuinely great images. Don’t let gear envy hold you back.
Focus on composition and technique first. If you then decide that you love macro photography, you can always upgrade to a dedicated macro lens such as this one which is still not an expensive lens and takes great images.

Macro Photography Ideas For Beginners At Home
One of the joys of macro photography is that you don’t need to go far to get good results. Everyday stuff in your house or garden can be a decent place to start.
Water droplets – I love photographing water droplets up close, there’s something cool about the reflections. Mist a bunch of flowers or capture them on your shower door.
Household items – There will be tons of stuff around your house to photograph close up. Try things like textures of clothes, figurines, jewellery or even the household spider who lives in your bathroom (I’ve named mine Theodore).
Food – Try practising macro shots on pieces of fruit, like kiwi and strawberries. Get really close up to the seeds.
Accessories – If you’ve got a sparkly ring or a cute little pin badge lying around, focus on all of the tiny details.
Whenever I’m stuck, I do a quick wander around the house to find something unusual and see how it looks through my macro lens. You’ll be surprised at how easily you can find macro photography ideas for beginners once you start looking.

Correctly Exposing A Macro Shot
Lighting can make or break your macro shots. It’s crucial to have the right amount of light coming in when you’re working so close to a subject.
Macro photography often involves small apertures (to get enough depth of field and have enough of the image in focus), which means you might need more light than usual. We’ll talk more about depth of field in the next section.
A higher ISO or a slower shutter speed might be necessary, but watch out for noise or camera shake. A tripod can help keep shots steady, especially when you’re shooting indoors.
You could also try some external lighting if you’re dealing with darker environments (like mushrooms in a dense forest) such as this budget macro mini cube light.

Depth of Field
Depth of field (DOF) is how much of your image is in focus from front to back.
A shallow depth of field (small f/stop number & wide aperture) means less of the images is in focus.
In macro work, depth of field can be extremely shallow, sometimes only a millimetre or two. Especially if you’re using a dedicated macro lens.
A wider aperture (like f/2.8) creates a dreamy blur, isolating just a tiny portion of your subject in sharp detail.

A smaller aperture (f/8 or f/11) can keep more of the subject in focus.

Don’t be afraid to experiment. If you’re shooting a tiny flower, a wide aperture might be stunning. If you want the entire bee or mushroom to be sharp, stop down to a smaller aperture.
If you want more of your subject in focus, consider focus stacking. This is a technique where you take multiple shots at different focus points, then merge them in editing software. It’s advanced, but you can create images with extreme detail across the entire subject and it’s what a lot of macro photographers do to achieve super crisp results.

Steady on There!
Because of the tiny details and shallow depth of field involved in macro photography, even the slightest movement can blur your image. Here are some tips for sharper shots:
- Use a tripod: A sturdy tripod (or even a small tabletop version) can stabilise your camera. Especially useful for still life macro like flowers and mushrooms but can be a bit trickier when photographing moving insects.
- Try a shutter remote: Pressing the shutter can introduce micro-vibrations. Using a self-timer or a remote shutter release helps eliminate that. On many cameras, you can set a 2-second timer to allow the camera to settle after you press the button. I just personally prefer the shutter remote release because it’s more instantaneous and I’m in impatient person.
- Be aware of the wind: If you’re outside photographing flowers or insects, a gentle breeze can knock your subject out of frame straight away. Wait for the wind to still or shield your subject using a piece of cardboard.
- Rock back and forth **MY FAVOURITE MACRO TIP**: If I’m shooting an insect handheld, the slice of my image in focus is usually very small and every movement I make will knock my subject out of focus. One trick I’ve learnt to do is manually focus on your subject, start taking pictures on burst mode and rock back and forth. This way, you’re bound to get your subject totally in focus in at least one of the pictures.
If you’re shooting handheld, with less stable setups, increasing your shutter speed or using image stabilisation (if your lens or camera has it) can help. Just be mindful of the trade-off, as a faster shutter speed might require a higher ISO in dimmer conditions, which can introduce digital noise.

Getting Creative with Backgrounds
One of my favourite macro photography ideas to play around with when I was a beginner, was trying different creative backgrounds. As you’re working with a tiny subject, you don’t have to have a photography specific backdrop, you can use anything as a backdrop.
Here are some of my favourites:
- Pastel coloured card: You can place simple sheets of pastel coloured paper or card behind the subject. This lets you choose a background colour that complements the subject, you can go for a softer version of the colour of your subject to stay on theme, or you can use the colour theory and pick something that contrasts it well.
- Glitter card: One of my favourites for macro as the little specks of glitter turn nice and blurry. Who doesn’t love a bit of glitter?
- Wallpaper samples: If you want a cheap but awesome backdrop, I’d highly recommend popping into your local B&Q and picking up a wallpaper sample for a quid. If you’re not in the UK, check if your local DIY store has any wallpaper samples.
- Wooden boards: A lot of food photographers use wooden boards creatively in their photography, so why not try it with a macro?
- Make your own: If you’re a handy painter or crafter, you could simply make your own backdrop.
Experiment with different distances between your subject and background. The further away your background is from your subject, the more blurry it will be.

Easy Macro Photography Ideas to Try For Beginners
Now that you have some of the basics, let’s get into some easy macro photography ideas that most beginners can tackle. These ideas are designed to be approachable while still offering you a chance to stretch your creative muscles.
- Dewy leaves and flowers: Wake up early and head outside to capture morning dew. Or spray a light mist of water onto petals. The tiny droplets catch the light beautifully.
- Sliced fruit: Slice open a strawberry, a kiwi, or citrus fruits like lemon and orange. Photograph the interesting patterns up close.
- Bubbles: If you have a shallow dish of water with a drop of soap, you can blow small bubbles and photograph the rainbow colours on the surface.
- Eyes: Human eyes are incredibly detailed. Just make sure you have a consenting subject who’s happy to have a camera inches from their face. Use gentle soft light and a higher f-stop to capture all of the detail in their iris.
- Feathers: If you find a feather on a walk, use it in a macro shot.
- Snowflakes: On a cold winter’s day, if snowflakes land on a dark surface (like a coat sleeve), you can quickly photograph their unique shapes before they melt. Isolate a snowflake by carefully using a pair of tweezers to remove and place the snowflake in position.
- Fabric: Get close up to fabric. Knitwear works really well, as it’s there is more texture.
- Ice in fizzy pop: Put some cubes of ice in a fizzy clear drink like Lemonade and photography them close up.
- Figurines: If you’re a collector of figurines, you can use macro photography to bring them to life. Put them in front of a backdrop and shoot from surface level to make them look full size.

Outdoor Macro Photography Ideas For Beginners
For those who prefer the great outdoors like me, nature is absolutely screaming with macro potential. Whether you’re in a countryside field, a local National Trust garden or a massive dense forest, you can discover fascinating little ecosystems.

Flowers:
Different species have unique shapes, colours, and pollination structures that make amazing macro photos.

Small creatures:
Ladybirds, bees, butterflies, snails, and spiders can look extraordinary up close. Just remember to move slowly so you don’t scare them away. Patience is the best practise for capturing macro photos of small critters.

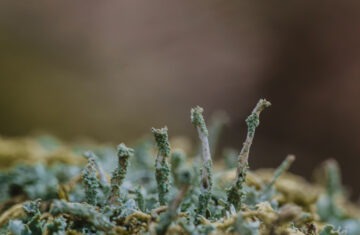
Moss/lichens:
Rocks, logs, and tree trunks often have patches of moss or lichen that, when viewed closely, resemble miniature forests. Also it’s quite nice to feel the moss, so that’s a bonus.

Long blades of grass:
You can get lots of variety from grass, believe it or not. If you’re outdoors and the time of year is quite bleak (there’s no flowers, mushrooms, bees etc.) then there is always grass to shoot. Try photographing the grass in the morning for dew, or after a rain shower.

Mushrooms:
In Autumn, forests are full of beautiful mushrooms both big and small. And as they don’t move, they’re a great macro subject to practise with. They’re actually my favourite macro subject of all time.
Shoot low and upwards to photograph their gills and try and see how close you can get to the super tiny mushrooms.
Be respectful of local wildlife and habitats. Avoid disturbing creatures or damaging plants. If you’re careful and patient, you’ll get memorable shots and leave no harm behind.

Pushing Your Creativity Even Further
Once you’re comfortable with these macro photography ideas for beginners, you might want to challenge yourself a bit more:
- Focus stacking: As mentioned earlier, you take multiple shots at slightly different focus points, then merge them in post to create a fully sharp image. Ideal for very detailed subjects like insects or mushrooms.
- Abstracts: Instead of shooting an entire flower, focus on a specific area like the swirly bit of a seashell. Abstract macros highlight colour, shape or texture without needing the context of the subject.
- Macro with external lighting: Experiment with small LED lights or off-camera flash to backlight subjects, or freeze movement (like a water droplet splash).
Learning macro photography means having to see the world differently. You’ll find yourself scanning surfaces for tiny subjects or crouching next to a bush hoping to spot a hidden insect.
It’s a fantastic way to photography mindfully and can help you slow down and appreciate the smaller things in life.
Anytime I’m out on a walk, I’m looking for mushrooms, insects and moss. That’s all down to macro photography.

What are some easy macro photography ideas for beginners?
If you’re new to macro photography, try photographing everyday objects with interesting textures or patterns – like water droplets on leaves, a slice of fruit, or even some cubes of ice in a fizzy drink. You can achieve impressive close ups using budget-friendly gear (such as clip-on phone lenses or affordable extension tubes) and natural light. By experimenting with angles, light, and backgrounds, you’ll quickly discover how fun and accessible macro shooting can be!

Final Thoughts on Macro Photography Ideas for Beginners
Macro photography can be accessible. You don’t need to spend a lot to get started.
Simple gear like clip-on phone lenses, macro filters, or extension tubes can be a great way to get started in the macro photography world.
The real magic lies in learning to see what’s right in front of you.
Macro is definitely a challenging learning experience that tests your patience. You might take several attempts before you nail the focus. But each little success feels immensely rewarding, and every “failure” is a learning opportunity. Take it step by step, and don’t be afraid to try new some of these macro photography ideas for beginners.
As your confidence grows a bit more, you’ll find yourself pushing boundaries and maybe investing in a dedicated macro lens, exploring focus stacking, or capturing ultra-close shots of little creatures.